
Când vine vorba de selecții în Photoshop, există cu adevărat două tipuri de oameni - cei care știu să utilizeze Instrumentul pentru pixuri și cei care se luptă. Majoritatea oamenilor renunță să învețe cum să folosească instrumentul Pen pentru o perioadă mai lungă de timp posibil, în timp ce alții nu se apropie niciodată de învățarea lui, considerând că este doar prea confuz, prea complicat și pur și simplu nenatural.
În cele din urmă, munca lor în Photoshop suferă pentru asta, din moment ce sunt blocați bazându-se pe instrumentul Lasso pentru aproape tot ceea ce nu pot selecta cu instrumentele de marcă dreptunghiulare sau eliptice. În acest tutorial Adobe Photoshop, vom pune capăt suferinței. Vom învăța cât de ușor este să faci selecții cu instrumentul Pen.
Acum, când spun „ușor”, nu vreau să spun că vei citi acest tutorial și vei fi transformat instantaneu într-un Master Master. Învățarea modului de utilizare a instrumentului Pen este foarte mult ca să înveți cum să mergi cu bicicleta. Odată ce ai aflat, va părea complet natural și te vei întreba cum oricine ar putea să nu știe să folosească ceva atât de simplu. Dar să ajungi la acel punct necesită puțină practică și efort, iar în timp ce citești fiecare carte, există cum să mergi cu bicicleta poate să te învețe elementele fundamentale ale modului de funcționare a pedalelor, a angrenajelor și a frânelor, nu este până când nu ești pe bicicletă în lupta pentru a vă păstra echilibrul că începe adevărata învățare.
Unul dintre lucrurile grozave despre Pen Tool este că nu este ceva exclusiv pentru Photoshop. Departe de! Practic, fiecare program popular de editare foto, grafică și aspect de pagină folosește instrumentul Pen într-o formă sau alta, așa că, după ce ai învățat cum să-l folosești în Photoshop, vei înțelege deja cum să-l folosești în multe și alte programe!
Unde găsesc instrumentul pentru stilou?
Înainte de a începe să vorbim despre ce este Pen Tool sau cum să îl folosim, ar trebui să ne uităm mai întâi unde să îl găsim în Photoshop. Veți găsi Instrumentul de stilou în paleta Instrumente, grupate cu Instrumente de formă, Instrumentul de tip și Instrumente de selectare a căii (săgeata albă) și Selecție directă (săgeata neagră) (vezi imaginea din stânga).
Photoshop's Pen Tool
Desigur, acest lucru poate ridica întrebarea de ce, dacă putem face selecții cu Instrumentul pentru stilou, nu este acesta grupat cu celelalte instrumente de selecție (Instrumentul pentru marcaje dreptunghiulare, Instrumentul pentru elica eliptică, Instrumentul Lasso etc.) la partea de sus a paletei Instrumente? De ce este acolo cu celelalte instrumente care, în mod evident, nu sunt instrumente de selecție?
Aceasta este o întrebare excelentă și se pare că există un răspuns la fel de excelent pentru a merge cu ea, la care vom ajunge într-o clipă.
De ce se numește instrumentul „Pen”?
Unul dintre primele piedici pentru a învăța cum să folosești instrumentul Pen, la fel ca în multe alte lucruri din Photoshop, este numele său, deoarece până la urmă, dacă există un lucru pe care îl știe toți cei care au încercat vreodată să îl folosească, acest lucru nu este un pix. Cel puțin, nu la felul de stilou la care te-ai gândi în mod normal când auzi cuvântul „pix”. Încercați să vă scrieți numele cu acesta, în același mod în care ați putea semna numele dvs. pe o bucată de hârtie cu un stilou și probabil veți ajunge cu o încurcătură răsucită și încurcată și lucrurile care se bucură între ele (desigur, cred că ar putea fi foarte bine cum îți semnezi numele).
 Pierre Bezier
Deci, dacă nu acționează ca un stilou tradițional cu cerneală, de ce se numește instrumentul Pen? Instrumentul pentru stilou a fost numit de-a lungul timpului mai multe lucruri și, prin asta, nu mă refer la felul de lucruri pe care le-ați numit în momente de frustrare. Este posibil să fi auzit că se numește stiloul Bezier sau instrumentul Bezier și asta pentru că a fost creat de un bărbat pe nume Pierre Bezier (adică el la stânga), un inginer francez și un om inteligent, care a venit cu matematica fantezistă care alimentează instrumentul în timp ce lucrează pentru compania auto Renault (Pen Tool a fost creată inițial pentru a ajuta proiectarea mașinilor).
Este posibil să fi auzit, de asemenea, Instrumentul pentru stilou, denumit Instrumentul Căi și acesta este cu adevărat cel mai potrivit nume pentru acesta. Instrumentul pentru stilou este totul despre desenarea „căilor”. Pentru a face selecții cu instrumentul Pen, pur și simplu convertim calea sau căile pe care le-am desenat în selecții. Începe întotdeauna, totuși, cu o cale.
Plugin Coduri scurte, acțiuni și filtre: eroare în codul scurt (ads-basic-basic-middle-2)
Ce este o cale?
O „cale” este, destul de sincer, ceva care poate părea puțin în afara unui program precum Photoshop. Motivul se datorează faptului că Photoshop este în primul rând un program bazat pe pixeli . Este nevoie de milioane de pixeli pătrați mici care alcătuiesc o imagine digitală tipică și face lucruri cu ei. Căile, pe de altă parte, nu au absolut nicio legătură cu pixelii, motiv pentru care am spus că pot părea în afara unui program care este folosit în principal pentru editare și desenare pixeli.
O cale este cu adevărat nimic altceva decât o linie care merge dintr-un punct în altul, o linie care este complet independentă și nu-i pasă nimic de pixelii de sub ea. Linia poate fi dreaptă sau poate fi curbată, dar merge întotdeauna dintr-un punct în alt punct și, așa cum am menționat, nu are nicio legătură cu pixelii din imagine. O cale este complet separată de imaginea în sine. De fapt, o cale este atât de separată încât, dacă ați încerca să imprimați imaginea dvs. cu o cale vizibilă pe ecran, calea nu ar apărea pe hârtie. De asemenea, dacă ați salvat imaginea ca fișier JPEG.webp și ați încărcat-o pe un site web, chiar dacă ați salvat imaginea cu calea vizibilă pe ecranul dvs. în Photoshop, nu o veți vedea în imaginea de pe site. Căile sunt doar pentru ochii dvs. și Photoshop. Nimeni altcineva nu le va vedea vreodată, decât dacă se întâmplă să treacă pe lângă computer în timp ce lucrați.
Avem întotdeauna nevoie de minimum două puncte pentru a crea o cale, deoarece trebuie să știm unde începe calea și unde se termină. Dacă folosim destule puncte pentru a ne readuce calea în același punct de la care a pornit, putem crea forme diferite din căi, care este exact cum funcționează diferitele Instrumente de formă Photoshop. Instrumentul Rectangle utilizează căi, conectate prin puncte, pentru a desena o formă dreptunghiulară. Instrumentul Elipsă folosește căi, conectate prin puncte, pentru a desena o formă eliptică ș.a. Este, de asemenea, modul în care funcționează Photoshop's Type Tool, deși Photoshop se ocupă cu tipul un pic diferit față de cel cu forme obișnuite, dar toate tipurile din Photoshop sunt realizate în mod esențial din căi. De fapt, puteți converti tipul în forme, care vă oferă apoi toate aceleași opțiuni de editare a căilor cu tipul pe care îl obțineți atunci când lucrați cu forme.
Este posibil să fi auzit și căi denumite contururi și asta este o descriere destul de bună a ceea ce este o cale, sau cel puțin, ce este o cale. Putem desena o cale pătrată și dacă nu facem altceva cu ea, ca în cazul în care nu o umplem cu o culoare sau nu îi aplicăm o lovitură, atunci tot ce avem este un contur de bază al unui pătrat. La fel și cu un cerc sau cu orice altă formă pe care o desenăm. Calea în sine este doar conturul formei. Abia când facem ceva cu calea, cum ar fi să o completăm, să aplicăm o lovitură sau să o transformăm într-o selecție, că calea devine de fapt ceva mai mult decât un contur de bază.
Puteți selecta o întreagă cale utilizând Instrumentul de selectare a căii (cunoscut și sub numele de instrumentul „săgeată neagră”) sau puteți selecta puncte individuale sau segmente de cale folosind Instrumentul de selecție directă (instrumentul „săgeată albă”). O cale "segment", sau "segment de linie" cum este numit uneori, este orice cale între două puncte. O cale dreptunghiulară, de exemplu, ar fi alcătuită din patru puncte (unul în fiecare colț), iar traseele individuale care leagă punctele împreună de sus, de jos, de stânga și de dreapta pentru a crea forma dreptunghiului sunt segmentele de cale. . Calea propriu-zisă este combinația tuturor segmentelor de cale individuale care alcătuiesc forma.
Acest lucru poate fi un pic confuz, așa că haideți să vedem ce vreau să spun. Deschideți un nou document în Photoshop. Nu contează ce mărime este. Voi alege dimensiunea 640x480 din lista presetărilor, dar așa cum am spus, nu contează ce mărime alegeți. Selectați instrumentul Pen din paleta Instrumente. Puteți, de asemenea, să selectați Instrumentul pentru stilou pur și simplu apăsând litera P de pe tastatură.
Cele două moduri Instrument de stilou
Acum, înainte de a continua, trebuie mai întâi să ne asigurăm că lucrăm cu căi și asta pentru că instrumentul Pen are de fapt două moduri diferite în care poate funcționa și, implicit, îl folosește pe celălalt. Cu instrumentul Pen selectat, dacă privim în bara de opțiuni din partea de sus a ecranului, vom vedea un grup de trei pictograme:

Bara de opțiuni din Photoshop care prezintă grupul de trei pictograme reprezentând fiecare dintre cele trei moduri Pen Tool.
Știu că am spus că există două moduri în care instrumentul Pen poate funcționa și totuși, de parcă pentru a face lucrurile mai confuze, există trei pictograme, dar pictograma din dreapta, care este pictograma Completare pixeli, este gri și nu este disponibilă când lucrați cu instrumentul Pen. Este disponibil numai atunci când lucrați cu diferitele instrumente de formă, deci există într-adevăr doar două pictograme pe care trebuie să le privim.
Pictograma din stânga este pictograma Shape layer, cunoscută și sub denumirea de „nu cea pe care o dorim” și este cea selectată implicit. Dacă ar fi să lucrăm cu instrumentul Pen cu acea pictogramă selectată, am fi desenat forme, la fel ca și cum am folosi oricare dintre diferitele instrumente de formă, cu excepția faptului că, în loc să desenăm o formă predefinită ca un dreptunghi sau o elipsă, ar putea desena orice formă dorită. Cum am spus totuși, nu asta ne dorim. Dorim pictograma de lângă ea, pictograma Căi, așa că mergeți înainte și faceți clic pe ea pentru a o selecta:

Tutoriale Photoshop: Faceți clic pe pictograma „Căi” din bara de opțiuni pentru a lucra cu căi cu instrumentul Pen.
Cu instrumentul Pen selectat și pictograma Căi selectate în bara de opțiuni, faceți clic o dată oriunde în interiorul documentului. Nu faceți clic și glisați, doar faceți clic. Când o faceți, veți adăuga un punct pătrat mic. Am extins-o aici:

Faceți clic o dată în interiorul documentului cu instrumentul Pen pentru a adăuga un punct.
Acest prim punct pe care tocmai l-am adăugat este punctul de plecare al căii noastre. În momentul de față, nu avem de fapt o cale. Tot ce avem este un punct de plecare. „Punctul” este denumit din punct de vedere tehnic punct de ancoră sau punct de ancorare și se numește asta pentru că ancorează calea în loc. Acest prim punct va ancora începutul căii către acest loc din interiorul documentului. Pe măsură ce adăugăm mai multe puncte, fiecare dintre ele va ancora calea în loc în acea locație.
Să adăugăm un alt punct. Faceți clic pe altă parte din document. Oriunde o va face. O să dau clic undeva în dreapta punctului meu inițial:

Tutoriale Photoshop: adăugați un al doilea punct de ancorare făcând clic pe altă parte din document.
Am adăugat acum un al doilea punct de ancorare și uite ce s-a întâmplat. Acum am o linie dreaptă care unește cele două puncte împreună! Linia dreaptă este calea mea. Așa cum am menționat anterior, avem nevoie de minimum două puncte pentru a crea o cale, deoarece trebuie să știm unde începe calea și unde se termină, iar acum că avem atât un punct de plecare, cât și un punct final, Photoshop a putut conecta două puncte împreună, creându-ne calea.
Haideți să adăugăm încă câteva puncte doar pentru distracție. Faceți clic de câteva ori în diferite locuri din document. Din nou, nu faceți clic și glisați, trebuie doar să faceți clic pe:
Adăugați puncte suplimentare dând clic pe diferite locuri din document.
În imaginea de mai sus, am adăugat încă șapte puncte de ancorare făcând clic pe diferite puncte cu instrumentul Pen și de fiecare dată când am adăugat unul, lungimea căii mele a crescut, deoarece a fost adăugat un nou „segment” de cale între punctul anterior și noul punct. Calea mea este acum formată din nouă puncte de ancorare și opt segmente de cale. Aș putea continua să dați clic în interiorul documentului pentru a adăuga mai multe puncte de ancorare și segmente de cale, dar ceea ce mi-ar plăcea să fac acum este să îmi închid calea, astfel încât să formeze o formă completă.
Închiderea unei căi
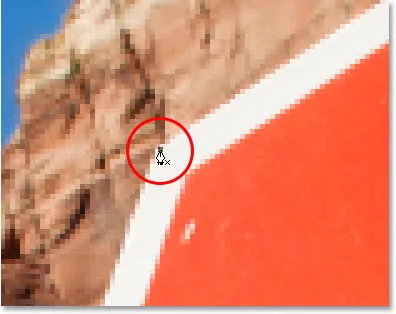
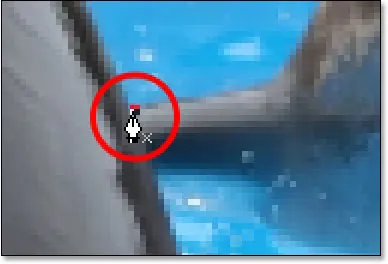
Pentru a închide o cale, tot ce trebuie să facem este să facem clic din nou pe punctul nostru inițial de pornire. Când treceți cursorul mouse-ului peste punctul de plecare, veți vedea un colț mic în colțul din dreapta jos al pictogramei pen:

Un cerc mic apare în colțul din dreapta jos al pictogramei pen-ului când treceți cursorul peste punctul inițial de pornire al căii.
Acest cerc ne spune că suntem pe cale să venim „cercul complet” cu calea noastră, terminând-o de unde a început. Pentru a-l închide, trebuie doar să faceți clic direct pe punctul de pornire.
Mai jos putem vedea că calea mea a devenit o cale închisă și acum este un contur de bază al unei forme:
Calea este acum închisă, terminând la punctul de plecare, creând o cale închisă.
Chiar dacă acest traseu a fost desenat doar pentru distracție, ca exemplu pentru a desena o cale de bază cu Pen Tool, pot transforma cu ușurință această cale într-o selecție. Pentru asta, avem nevoie de paleta Photoshop's Paths și ne vom uita la asta în continuare.
Întoarcerea unei căi într-o selecție
Până acum, am analizat ce este o cale și cum să desenăm o cale de bază cu Photoshop's Pen Tool. Dar cum ai de gând să faci o selecție din calea?
Uşor! Există câteva modalități de a transforma o cale într-o selecție, inclusiv o comandă rapidă a tastaturii, dar înainte de a privi modul rapid, să ne uităm la modul oficial. „Modul oficial” implică folosirea paletei Photoshop's Paths, pe care o veți găsi grupată cu paleta Straturi și paleta Channel:
Photoshop's Palette Paths.
La prima vedere, paleta Paths arată foarte asemănătoare cu paleta Photoshop’s Layers, iar Adobe intenționat a făcut-o astfel încât să vă simțiți mai confortabil folosind-o. Putem vedea o previzualizare în miniatură a formei căii pe care tocmai am creat-o și, în mod implicit, Photoshop numește calea „Calea de lucru”, care este practic un mod de a spune „temporar”, ca și cum ar fi să creezi un alt mod calea acum fără a redenumi această cale la altceva mai întâi, aceasta ar fi înlocuită cu noua cale. Puteți avea o singură „cale de lucru”, așa că, dacă doriți să o păstrați, va trebui să faceți dublu clic pe numele acesteia din paleta Căi și să o numiți altceva înainte de a crea o nouă cale.
Întrucât calea mea pare un pic ca o coroană, voi face dublu clic pe numele „Work Path”, care cu caseta de dialog Salvează calea Photoshop și voi redenumi calea „Crown”:

Puteți salva o „cale de lucru” temporară pur și simplu redenumind-o.
Voi face clic pe OK când am terminat, iar acum dacă mă uit din nou în paleta Căii, pot vedea destul de sigur, „Calea de lucru” a fost redenumită „Crown”:
Paleta Căi care arată că calea a fost redenumită „Coroana”.
Redenumind-o, calea este acum salvată și nu va dispărea pe mine dacă merg să creez o nouă cale. De asemenea, orice cale salvată este salvată cu documentul Photoshop, deci acum, dacă salvez documentul meu, calea va fi salvată cu acesta și data viitoare când deschid documentul, calea va fi încă acolo în paleta Căi.
Salvarea unei căi nu este ceva ce trebuie să faceți pentru a o transforma într-o selecție. În cele mai multe cazuri, atunci când utilizați instrumentul Pen pentru a face selecții, nu veți mai avea nevoie de calea odată ce ați făcut o selecție din ea, astfel încât nu va fi nevoie să o salvați. Dacă totuși ați dorit să îl salvați, redenumiți-l în altceva decât „Calea de lucru” și este salvat.
Pentru a transforma calea într-o selecție, dacă privim partea de jos a paletei Căi, putem vedea mai multe pictograme. Aceste icoane ne permit să facem lucruri diferite cu calea noastră. Prima pictogramă din stânga este calea Completare cu pictograma de prim plan și, după cum îi spune și numele, făcând clic pe ea, ne vom umple calea cu culoarea noastră actuală. Interesant, dar nu asta ne dorim. A doua pictogramă din stânga este calea Stroke cu pictograma perie, care va aplica o cursă pe calea noastră folosind orice perie pe care am selectat-o în prezent.
Aceasta este o modalitate excelentă de a crea efecte interesante în Photoshop, dar pentru ceea ce facem aici, transformând o cale într-o selecție, nici nu ne dorim. Cea pe care o dorim este a treia pictogramă din stânga, Calea de încărcare ca pictogramă de selecție:
Pictograma „Încărcare cale ca selecție” din partea inferioară a paletei Căi.
De îndată ce dau clic pe această pictogramă, calea mea din documentul meu devine o selecție, ca și cum aș fi creat-o folosind oricare dintre instrumentele de selecție mai comune ale Photoshop:
Calea a fost acum transformată într-o selecție.
Este atât de ușor! De fapt, este chiar mai ușor decât atât, deoarece există o scurtătură de la tastatură pentru a transforma o cale într-o selecție, fără a fi nevoie să comutați deloc la paleta Paths. Când v-ați trasat calea și sunteți gata să o transformați într-o selecție, pur și simplu apăsați Ctrl + Enter (Win) / Command + Return (Mac) pentru ca Photoshop să transforme calea într-o selecție.
Până acum, poate vă va fi ceva mai evident de ce, deși Instrumentul Pen este foarte mult un instrument de selecție, acesta nu este grupat cu celelalte instrumente de selecție din partea de sus a paletei Instrumente. Motivul se datorează faptului că instrumentul Pen este în primul rând un instrument de cale. Creează selecții creând mai întâi căi și, din acest motiv, are mai multe în comun cu diferitele instrumente de formă și instrumentul de tip, toate folosind căi, decât cu instrumentele de selecție de bază, cum ar fi instrumentul dreptunghiular de marcă sau Lasso Instrument, care face selecții bazate doar pe pixeli.
Să ne uităm la un exemplu practic din ceea ce am învățat până acum. Aici avem o fotografie cu un semn de oprire în fața unor stânci stâncoase:

O fotografie cu un semn de oprire.
Să spunem că am vrut să selectez acel semn de oprire, astfel încât să-l pot copia pe propriul strat. Semnul de oprire nu este format decât o serie de linii drepte, ceea ce va face acest lucru extrem de ușor. În primul rând, am nevoie de un punct de plecare pentru calea mea, așa că voi începe în colțul din stânga sus al semnului făcând clic o dată pentru a plasa un punct inițial de ancorare. În acest caz, nu prea contează unde încep calea, dar voi începe în colțul din stânga sus:
Faceți clic o dată în colțul din stânga sus al semnului de oprire pentru a începe calea cu un punct inițial de ancorare.
Observați cum sunt măriți aici când fac clic. Veți găsi mai ușor atunci când faceți selecții cu instrumentul Pen pentru a mări puțin imaginea. În acest fel, puteți fi sigur că vă păstrați calea chiar în interiorul zonei pe care doriți să o selectați.
Momentan nu am o cale, am doar un punct de plecare pentru calea mea. Pentru a crea calea, tot ce trebuie să fac este să ocolesc semnul adăugând un punct de ancoră în fiecare colț în care calea trebuie să schimbe direcția. Pe măsură ce adaug fiecare punct de ancorare, va apărea un segment de cale nouă care se va alătura punctului de ancoră anterior cu cel nou, până când am parcurs tot semnul. Pentru a închide calea, pur și simplu dau clic înapoi pe punctul de plecare inițial. Este puțin greu de văzut în imaginea de mai jos, dar acum am o cale în jurul întregului semn de oprire, inclusiv postarea la care este atașat, pur și simplu făcând un clic pe colțurile în care calea trebuie să schimbe direcția:

O cale apare acum în jurul semnului de oprire din imagine.
Dacă mă uit acum în paleta Paths, pot vedea foarte clar că am o cale în forma semnului de oprire:
Paleta Photoshop's Paths care arată calea trasată în jurul semnului de oprire.
Observați cum Photoshop a numit calea „Calea de lucru”, ceea ce înseamnă că această cale este temporară și o voi pierde dacă creez o altă cale, fără să o salvez pe prima, redenumind-o. Chiar dacă nu creez o cale nouă, o voi pierde în continuare atunci când închid documentul, decât dacă îl salvez primul. Cu toate acestea nu am nevoie să salvez această cale, așa că nu mă voi îngrijora. În cele mai multe cazuri, nu va trebui să vă faceți griji pentru asta.
Pentru a converti calea mea într-o selecție, voi face clic pe Calea de încărcare ca pictogramă de selecție din partea inferioară a paletei Straturi sau aș putea la fel de ușor să apăs pe Ctrl + Enter (Win) / Command + Return (Mac):
Faceți clic pe pictograma „Încărcare cale ca selecție” din paleta Căi, sau apăsați „Ctrl + Enter” (Câștigă) / „Comandă + Șterge” (Mac) pentru a converti calea într-o selecție.
De îndată ce o fac, calea mea este transformată într-o selecție, iar semnul de oprire este acum selectat:

Semnul de oprire este acum selectat după transformarea căii într-o selecție.
Voi reveni la paleta mea Straturi și pentru a copia semnul de stop pe propriul strat, voi folosi comanda rapidă de la tastatură Ctrl + J (Win) / Command + J (Mac), care plasează semnul singur strat deasupra stratului Fundal:
Semnul de oprire a fost acum copiat pe propriul strat separat.
Cu semnul acum pe propriul strat, pot face orice îmi place cu el, schimbând fundalul cu o imagine diferită sau făcând fundalul alb-negru lăsând semnul în culoare, la orice pot crede. Ideea este că am reușit să selectez cu ușurință semnul făcând clic în colțurile cu instrumentul Pen, care a creat o cale în jurul semnului, apoi am transformat pur și simplu calea într-o selecție.
Până în prezent, în ceea ce privește realizarea selecțiilor cu instrumentul Pen în Photoshop, am aflat că stiloul este de fiecare dată un instrument de selecție, ca instrumente de selecție mai obișnuite Photoshop, cum ar fi Rectangular Marquee și Lasso Tools, dar că în loc să facă selecții bazate pe pe pixeli, așa cum fac și celelalte instrumente, instrumentul Pen desenează trasee care pot fi apoi ușor convertite în selecții, fie din paleta Căi, fie prin intermediul unei comenzi rapide de la tastatură.
De aceea, stiloul Pen nu se găsește în partea de sus a paletei Instrumente cu acele alte instrumente de selecție bazate pe pixeli, ci este în schimb grupat cu instrumentele de cale, cum ar fi diferitele Instrumente de formă, Instrumentul de tip și Instrumentele de selecție a căilor și selectare directă . Instrumentul pentru stilou este doar despre căi, nu pixeli.
Am învățat că putem adăuga puncte de ancorare în documentul nostru, care ancorează calea în loc, făcând pur și simplu clic pe diferite locuri cu instrumentul Pen și, pe măsură ce adăugăm tot mai multe puncte de ancorare, creăm o cale ca fiecare punct nou. este conectat la punctul anterior printr-un nou segment de cale. De asemenea, am aflat că o cale este ceea ce se numește de obicei un „element care nu imprimă”, ceea ce înseamnă că, indiferent de câte trasee am adăuga, niciuna dintre ele nu va fi vizibilă pe hârtie când vom merge la imprimarea imaginii . De asemenea, acestea nu vor fi vizibile dacă afișăm imaginea pe un site web. Căile ne sunt vizibile doar atunci când lucrăm în Photoshop (deși alte programe precum Adobe Illustrator acceptă și căi). Abia când facem ceva cu calea, cum ar fi să o completăm cu o culoare, să-i aplicăm o lovitură sau să o transformăm într-o selecție, că calea devine ceva mai mult decât un element de bază, care nu imprimă o formă.
Am văzut cât de ușor ar fi să folosești Instrumentul Pen pentru a selecta ceva precum un semn de oprire, subliniind-o cu o cale formată dintr-o serie de segmente de cale dreaptă și apoi transformând calea într-o selecție. Asta este grozav, dar într-adevăr, încă nu am făcut nimic pe care nu l-am fi putut face mai ușor cu ceva precum Lasso Tool, sau chiar mai bine, Instrumentul poligonal Lasso, care a fost creat special pentru selectarea formelor cu față plată, precum oprirea noastră semn. Șansele sunt, dacă nu ai o fascinație ciudată cu indicatoarele rutiere, mai devreme sau mai târziu vei dori să selectezi ceva ceva mai interesant, iar prin „interesant” mă refer la mai provocatoare. Și prin „provocare” mă refer la ceva care conține curbe. Selectarea unui obiect curbat în Photoshop este de obicei atunci când te simți pierzând tot respectul pentru instrumentele de selecție de bază. Din fericire, se întâmplă, de asemenea, să fie momentul în care Pen Tool strălucește cu adevărat!
Înainte de a continua, ar trebui să subliniez că tot ceea ce am făcut până în acest moment a fost destul de simplu. Faceți clic aici, faceți clic acolo, convertiți calea într-o selecție, făcută. Următoarea parte în care vom intra în desenarea curbelor nu este la fel de simplă, deși cu siguranță nu este dificilă, dar dacă este prima oară cu Pen Tool sau nu aveți prea multă experiență cu aceasta, lucrul cu curbe poate părea un putin nefiresc si chiar putin coplesitor. Acesta este cu siguranță locul în care apare analogia „călărit pe bicicletă”. Puteți cădea de câteva ori la început și vă întrebați cum reușește cineva să o facă, dar cu cât practicați mai mult și cu cât rămâneți mai mult cu ea, cu atât mai mult simțiți totul începe să facă. În cel mai scurt timp, vi se va părea a doua natură și veți înțelege brusc de ce atât de mulți oameni se jură că Pen Tool este unicul instrument de selecție cel mai mare din Photoshop! Serios, chiar este.
Obținerea unui mâner pe mânerele de direcție
Să începem din nou cu instrumentul Pen. Deschideți un nou document Photoshop în gol sau pur și simplu ștergeți ceea ce ați făcut până acum în documentul existent, astfel încât să începem noi. Apoi, cu instrumentul Pen selectat și opțiunea Căi selectate în bara de opțiuni (amintiți-vă, este implicit opțiunea Shape layer, așa că va trebui să vă asigurați că aveți opțiunea Căi selectate), faceți clic o dată oriunde în documentul dvs., la fel ca am făcut înainte. De data aceasta însă, mai degrabă decât să faceți clic pentru a adăuga un punct de ancorare, faceți clic și apoi trageți mouse-ul la o distanță scurtă de punctul de ancora, înainte de a elibera butonul mouse-ului:
Faceți clic pe oriunde în interiorul documentului cu instrumentul Pen, apoi trageți la o distanță scurtă de punctul de ancorare.
Când ați terminat, veți vedea un punct de ancorare cu două linii care se extind din ea. La prima vedere, s-ar putea să credeți că am reușit cumva să tragem o cale cu instrumentul Pen. La urma urmei, se pare că avem trei puncte de ancorare, unul la capăt și unul la mijloc, cu două segmente de cale care le leagă. Dacă arătăm un pic mai aproape, putem vedea că punctele de pe ambele capete sunt puțin mai mici decât cele din mijloc și că de fapt sunt o formă diferită. Cel din mijloc este pătrat și, așa cum am văzut, un punct de ancoră este pătrat, dar cele de pe ambele capete par să aibă formă de diamant. Unele puncte de ancoră sunt pătrate și unele în formă de diamant?
Nu. Toate punctele de ancorare sunt pătrate și toate au aceeași dimensiune, ceea ce înseamnă că acele puncte mai mici, în formă de diamant de la capete, nu sunt puncte de ancorare. Și dacă nu sunt puncte de ancorare, asta înseamnă că liniile nu sunt segmente de cale, deoarece avem nevoie de cel puțin două puncte de ancorare pentru a crea o cale, iar acum singurul punct de ancoră pe care îl avem este cel din mijloc. Deci, care sunt exact aceste linii care se extind din punctul de ancorare? Sunt mânere de direcție!
"Ah, direcția se ocupă!" tu spui. "Acum inteleg!"
… … …………….
"Stai, nu, nu. Ce dracu sunt mânerele de direcție?"
Mânerele de direcție sunt, bine, mânere și sunt utilizate numai la crearea de segmente de cale curbă. Nu este nevoie de mânere de direcție atunci când creați segmente de cale dreaptă. De obicei, există două, deși uneori există doar unul și, așa cum am văzut deja, se extind din punctele de ancorare. Se numesc „mânere” pentru că, așa cum vom vedea într-o clipă, le puteți apuca de fapt și le puteți muta.
Mânerele de direcție controlează două lucruri. Ele controlează unghiul curbei și controlează lungimea curbei și o fac într-un mod curat. Motivul pentru care există de obicei două dintre ele este acela că unul dintre ei controlează unghiul și lungimea curbei care intră în punctul de ancorare, iar celălalt controlează unghiul și lungimea curbei care iese din punctul de ancorare.
Înainte de a privi cum să desenăm curbele cu mânerele de direcție, să vedem mai întâi cum să controlăm singure mânerele, deoarece succesul nostru cu curbele de desen va depinde mult de capacitatea noastră de a controla mânerele. Nu vă faceți griji, nu este, așa cum spun ei, știința rachetelor. Există doar câteva lucruri simple pe care trebuie să le înveți. Am văzut deja cum să creăm mânere de direcție, făcând clic cu instrumentul Pen și apoi târând departe de punctul de ancorare. Cu cât este mai departe de punctul de ancoră pe care îl tragem, cu atât va fi mai lungă direcția de mânuire. Cu cât mânerul este mai lung, cu atât curba este mai lungă. Mâner scurt, curbă scurtă. Mâner lung, curbă lungă.
Unul dintre lucrurile frumoase pe care le vei învăța destul de repede despre instrumentul Pen este că este extrem de iertător. Nu există niciun motiv să vă faceți griji în privința corectării lucrurilor pentru prima dată când trageți căi cu el, pentru că putem să ne întoarcem și să remediem lucrurile cu ușurință când terminăm! Ați așezat un punct de ancorare în locul greșit? Nici o problema! Mută-l acolo unde ai nevoie! Vom vedea cum să facem asta într-o clipă. Ai tras un mâner de direcție într-o direcție greșită? Nici o problema. Apucați mânerul și rotiți-l în direcția de care aveți nevoie. Din nou, vom vedea cum să facem asta. Unul dintre direcțiile dvs. se ocupă prea mult sau prea scurt? Nici o problema. Doar faceți clic pe el și apoi trageți-l mai mult sau mai scurt după cum este necesar (da, vom vedea cum să facem și asta). Căile sunt complet modificabile în orice moment, așa că nu există absolut niciun motiv să vă faceți griji pentru a face o greșeală sau pentru a o face corect prima dată. Nu te face să te simți deja mai bine?
Mânere de direcție de rotire și redimensionare
Așa cum am menționat, sunt numiți „mânere” de direcție, deoarece le puteți apuca ca mânere și să le mutați. Să vedem cum să facem asta. În primul rând, vom analiza cum să rotim ambele mânere în același timp. Folosind punctul de ancorare și cele două mânere de direcție pe care le-am creat deja, țineți apăsată tasta Ctrl (Win) / Command (Mac). Veți vedea pictograma dvs. Pen Tool se va transforma temporar în pictograma Instrumentul de selecție directă (săgeata albă) și asta pentru că cu instrumentul Pen selectat, menținerea „Ctrl / comandă” devine o scurtătură rapidă pentru accesarea temporară a instrumentului de selecție directă care este ce folosim pentru a selecta diferite părți ale căii noastre. Apoi pur și simplu faceți clic direct pe forma de diamant mică de la capătul oricăreia dintre mânerele de direcție (făcând clic pe „linia” în sine nu va funcționa, așa că trebuie să faceți mereu clic pe forma de diamant de la capătul unui mâner pentru a face orice. cu ea) și trageți-l în jurul punctului de ancorare pentru a-l roti. Pe măsură ce rotiți unul dintre mânere, celălalt mâner se rotește împreună cu acesta în direcția opusă, cam ca un ferăstrău. De asemenea, puteți observa că de îndată ce începeți să trageți mânerul, pictograma cursorului mouse-ului se va schimba din nou, de data aceasta în pictograma Mutare instrument, deoarece mutăm ceva de la un loc la altul:
Țineți apăsat „Ctrl” (Win) / „Command” (Mac) și faceți clic pe capătul oricăruia dintre mânerele de direcție, apoi trageți mânerul pentru a-l roti în jurul punctului de ancorare. În timp ce trageți un mâner, celălalt se rotește în direcția opusă.
Puteți elibera tasta „Ctrl / Command” după ce ați început să trageți de mâner. Nu este nevoie să o mențineți tot timpul.
Pentru a redimensiona un mâner de direcție pe măsură ce îl rotiți, trageți pur și simplu capătul mânerului în direcția punctului de ancorare pentru a o face mai scurtă sau trageți-l departe de punctul de ancorare pentru a-l prelungi. După cum am menționat mai sus, un mâner mai scurt va face curba mai scurtă, iar un mâner mai lung va face curba mai lungă. Cu toate acestea, nu puteți redimensiona ambele mânere în același timp, așa că, dacă trebuie să redimensionați ambele, va trebui să le trageți pe fiecare mai mult sau mai scurt separat. Singurul lucru pe care îl puteți face amândoi în același timp este să le rotiți. Dacă ați eliberat deja butonul mouse-ului după rotirea mânerelor și cursorul s-a schimbat din nou în pictograma Pen Tool și trebuie să redimensionați unul dintre mânere, va trebui să țineți apăsat din nou „Ctrl / Command” pentru a trece temporar întoarceți-vă la Instrumentul de selecție directă, apoi dați clic și trageți la capătul mânerului pentru a-l redimensiona:
Trageți capetele mânerelor în direcția punctului de ancorare pentru a le scurta sau trageți-le departe de punctul de ancorare pentru a le face mai lungi.
Acum să ne uităm la cum să rotim mânerele independent unul de celălalt. To rotate one handle without affecting the other one, first release your mouse button if you've been rotating or resizing the handles so your cursor changes back into the Pen Tool icon. Then, instead of holding down "Ctrl/Command", which moves both handles at once, hold down your Alt (Win) / Option (Mac) key and click on the end of either of the direction handles. You'll see your cursor change into the Convert Point Tool icon, which looks like a simplified arrow made of only two lines, almost like an upside down letter "v" (except that it's not quite upside down). Then, simply drag the handle around the anchor point to rotate it, just as you did before, and this time, the handle will rotate independently of the other one, breaking the connection between them:
Hold down "Alt" (Win) / "Option" (Mac) and click on the end of either of the direction handles, then drag the handle to rotate it around the anchor point independently of the other handle.
Again, you can release your "Alt/Option" key after you've started dragging. You don't have to hold it down the whole time.
You can also resize direction handles using the "Alt/Option" key in exactly the same way as you can with the "Ctrl/Command" key. If you're in the process of rotating a handle, simply drag it in towards the anchor point to make it shorter or away from the anchor point to make it longer. If you've already released your mouse button and your cursor is showing the Pen Tool icon again, you'll need to hold down "Alt/Option" once again, then click on the end of the handle and drag it to resize it.
Is there a difference between resizing the handles using "Ctrl/Command" and using "Alt/Option" to do it? Yes there is. If you haven't yet "broken the connection" between the handles by dragging one independently of the other, resizing a handle using "Ctrl/Command" will keep the handles connected together. It won't resize both handles at once, but it won't break the connection between them either so you'll still be able to rotate them together if you need to. If you resize a handle using "Alt/Option", you'll break the connection between the handles. Even if you don't rotate the handle as you're resizing it, the connection will still be broken.
What if you've broken the connection between the handles by rotating them using "Alt/Option" and then want to rotate them together again? Can you "rebuild the connection", so-to-speak, by selecting one of them while holding down "Ctrl/Command" as before? Good question, and the answer is no. Once you've broken the connection between the handles, the "Ctrl/Command" key on its own won't bring it back. You'll need to select one of the handles while holding Ctrl+Alt (Win) / Command+Option (Mac) at that point in order to move the handles together again.
Quick Summary So Far …
We've covered a lot of information here about working with direction handles, so before we move on and start drawing some actual curves, let's do a quick recap:
- To add an anchor point, simply click with the Pen Tool.
- To add an anchor point with direction handles extending out from it, click with the Pen Tool, then drag away from the anchor point before releasing your mouse button. The further you drag, the longer the direction handles will be.
- To rotate the direction handles together, hold down Ctrl (Win) / Command (Mac), which will temporarily switch you to the Direct Selection Tool, then click on the end of either handle and drag it around the anchor point. The other handle will rotate in the opposite direction.
- To rotate the direction handles independently, hold down Alt (Win) / Option (Mac), which will temporarily switch you to the Convert Point Tool, then click on the end of either handle and drag it around the anchor point. The other handle will not rotate.
- To resize handles without breaking the connection between them, hold down Ctrl (Win) / Command (Mac) to switch to the Direct Selection Tool, then click on the end of either handle. Drag it towards the anchor point to make it shorter, or drag it away from the anchor point to make it longer.
- To resize handles and break the connection between them, hold down Alt (Win) / Option (Mac) to switch to the Convert Point Tool, then click on the end of either handle. Drag it towards the anchor point to make it shorter, or drag it away from the anchor point to make it longer.
- To rotate the direction handles together after breaking the connection, hold down Ctrl+Alt (Win) / Command+Option (Mac), then click on the end of either handle and drag it around the anchor point. The other handle will once again rotate with it.
Okay, that pretty much covers the basics of how to control the direction handles. Let's see how we can use them to draw some curves!
We've covered a lot of ground so far. We know about anchor points and direction handles. We know that in order to draw straight path segments, all we need to do is lay down a series of anchor points wherever we need them simply by clicking with the Pen Tool, and as we add more and more anchor points, we add more straight sections to our path. We know how to create direction handles and how to rotate them, either together or separately, and how to resize them.
We know how to turn a path into a selection by clicking on the "Load path as selection" icon at the bottom of the Paths palette or by simply pressing "Ctrl+Enter" (Win) / "Command+Return" (Mac) on the keyboard. One thing I didn't mention yet is that regardless of whether our path consists of straight lines,
curves, or a combination of straight lines and curves, converting it into a selection is done exactly the same way, and we've already learned how to do it, which means we're well on our way to mastering making selections with the pen! All we need to do is get a bit of practice drawing curves, which is exactly what we're about to do!
Tot defilați? Descărcați acest tutorial ca PDF!
Drawing A Curve
Let's once again start fresh, either by opening up a new blank document in Photoshop or by deleting what you've already done. We're going to draw our first curve so we can put all of our newly-aquired direction handle knowledge to use. First, with the Pen Tool selected and the Paths option selected in the Options Bar, click once somewhere in your document to add an anchor point. Just click, don't click and drag. You should have one single anchor point on the screen when you're done.
Then, move your mouse cursor up and to the right of your initial anchor point. Click again to add a second anchor point, but this time, drag your mouse a little to the right of the anchor point to drag out direction handles. Hold down Shift as you drag to constrain your movement to a horizontal direction. As you drag out the direction handles, you'll see your path appearing as a curve between the two anchor points! The further you drag your mouse, the longer you make the direction handles, and the more of a curve you create:
Click once to add an anchor point, then click and drag out a second anchor point with direction handles, creating a curved path segment between the two points.
Click down and to the right of the second anchor point to add a third anchor point. This time, don't click and drag, just click:
Add a third anchor point down and to the right of the second one by clicking with the Pen Tool.
As soon as you add the third anchor point, a second path segment will appear, joining the second anchor point with the third one. And because our second anchor point has direction handles extending from it, this new path segment is also curved! We now have a nice, smooth arc starting from the first point on the left, then passing through the anchor point with the direction handles up top, and coming to an end at the third point.
One thing you may have noticed, and you can see it in the screenshot above, is that when you added the third anchor point, the direction handle extending out the left side of the second anchor point disappeared. It's still there, Photoshop simply hid it from view. To see it again, use the keyboard shortcut we've already learned to temporarily switch to the Direct Selection Tool, which is by holding down the Ctrl (Win) / Command (Mac) key, and then click on the second anchor point to select it. As soon as you do, the missing direction handle reappears as if it was there the whole time (which it was):

Hold down the "Ctrl" (Win) / "Command" (Mac) key to temporarily switch to the Direct Selection Tool, then click on the top anchor point to select it. The missing anchor point reappears.
With your "Ctrl/Command" key still held down so you still have access to the Direct Selection Tool, try resizing each direction handle by clicking on the end of each one to select it and then dragging it towards and away from its anchor point. Again, hold "Shift" as you drag to constrain your movement horizontally, and watch what happens. As you increase the length of a handle, you get more of a curve, and as you decrease its length, you get less of a curve. Also notice that each handle controls its own side of the curve. The handle on the left controls the curve coming into the anchor point from the left, and the handle on the right controls the curve flowing out from the anchor point on the right.
Here, I've made my handle on the left shorter, and as we can see, there's much less of a curve now than there was originally, almost becoming a straight line. I've also made the handle on the right longer, and as a result, the curve on the right is now much more pronounced. The faint curve is the original for comparison:
Change the shape of the curves by resizing the direction handles. The left handle controls the left curve, and the right handle controls the right curve.
I'm going to undo my changes by pressing Ctrl+Alt+Z (Win) / Command+Option+Z (Mac) a couple of times to set my direction handles back to their original sizes so they're equal length once again. Now let's try rotating the handles. Hold down "Ctrl/Command" once again to access the Direct Selection Tool, then click on the end of either handle to select it and try rotating it around the anchor point. Since we selected the handle with "Ctrl/Command", both handles rotate together. Here I've dragged my left handle down and to the right, and the angle of the curve on the left changed along with it, now appearing as more of a slope as it rises up towards the anchor point. By dragging the left handle down and to the right, I caused the right handle to rotate up and to the left, and again, the angle of the curve on the right changed along with it, now rising above the anchor point briefly before making a steep decent down to the anchor point on the right. Again, the faint curve is the original for comparison:
Rotate the direction handles to change the angle of the curves. Select a handle while holding "Ctrl" (Win) / "Command" (Mac) to rotate both handles together.
The Dreaded "Loop"
One thing you want to avoid is rotating the handles too far, which will cause your path segments to overlap and create loops. Here, I've rotated my handles all the way around so that the left handle is now on the right and the right handle is on the left, and notice what's happened. My path segments are now overlapping each other, creating a loop:
Rotating the direction handles too far causes the path segments to overlap, creating an unwanted loop in the path.
Loops can be caused by rotating the direction handles too far, as I've done above, but more often than not, they're caused by a handle being too long, making the curve too long and causing it to overlap with itself. If that happens, which it does sometimes as you're drawing a path, simply shorten the length of the direction handle. Most people end up creating a whole bunch of loops in their path when they first start working with the Pen Tool, so don't think you're the only one. No need to panic or become frustrated though. As I said, the problem is most likely being caused by a direction handle being too long, and all you need to do is shorten the handle to "un loop" the loop!
I'm going to press Ctrl+Alt+Z (Win) / Command+Option+Z (Mac) a few times once again to undo my changes and reset my path back to the nice smooth arc I started with. Now, what about rotating the direction handles independently of each other? As we learned on the previous page, to rotate the handles separately, instead of selecting them with "Ctrl/Command", we simply select them while holding down Alt (Win) / Option (Mac), which gives us temporary access to the Convert Point Tool. Click on the end of a handle to select it, then drag it with your mouse to rotate it and this time, the other handle will stay in place, breaking the connection between them.
Here, I've selected the handle on the right while holding "Alt/Option" and then rotated it down and to the left. Notice how once again, the angle of the path segment on the right changes to match the new direction of the handle, and this time, the handle on the left, along with the path segment on the left, both stay in place. My path now looks a bit like a shark fin:
Hold down "Alt" (Win) / "Option" (Mac) to temporarily access the "Convert Point Tool", then click on the end of a direction handle to select it and rotate it independently of the other handle.
Moving An Anchor Point
One thing we haven't looked at yet is how to move an anchor point. If you recall, I mentioned on the previous page that the Pen Tool is extremely forgiving, and one of the reasons for it, besides being able to rotate and resize our direction handles after we've created them, is that we can easily move anchor points from one spot to another if we need to. As we've already learned, anchor points anchor a path into place. The anchor points themselves, however, are not anchored into place. You can move an anchor point anywhere, anytime, and any path segments that are connected to it will move and adjust right along with it.
To move an anchor point, hold down Ctrl (Win) / Command (Mac) to temporarily access the Direct Selection Tool as we've already been doing, then simply click on the anchor point to select it and drag it to its new location with your mouse. Any path segments connected to it will move with it to the new location. Here, I've dragged my middle anchor point down a bit from its original location (again, the faint path marks the original location for comparison). Notice how the path itself has changed shape to adjust to the new location of the anchor point:
Hold down "Ctrl" (Win) / "Command" (Mac) and click on an anchor point to select it, then drag it to a new location. Any path segments connected to the point will move with it, changing shape as needed.
Normally, when outlining an object with a path to select it using the Pen Tool, you won't need to move to an anchor point quite as far as what I've done above, but it's very common to go back around your path after you've created it and nudge a few anchor points here and there to fine-tune the path. Once you've selected an anchor point, you can nudge it up, down, left or right using the arrow keys on your keyboard.
Combining Straight Paths With Curves
What if I didn't want both of my path segments to be curves? What if what I needed was for the first path segment to be curved, but the second one needed to be straight? Let's see how to do that. I'm going to delete my existing path and start over again. First, I'll click to add an anchor point to start things off. Then, just as before, I'll click to add a second anchor point up and to the right of my initial point, and this time, I'll drag out direction handles, which will create a curved path connecting the two points, giving me exactly what I had way up at the start of this page:
Click once to add an anchor point, then click to add a second anchor point and drag out direction handles to create a curve.
I now have my initial curve, but I want my next path segment to be straight. If I was to simply click somewhere to add another anchor point right now, I would get another curve because I have that direction handle extending out from the right side of the last anchor point I added. What I need to do is get rid of that one direction handle. Without a direction handle controlling the angle and length of a curve, we get a straight line.
To remove the handle, leaving only the handle on the left of the anchor point, all I need to do is hold down Alt (Win) / Option (Mac), which will again temporarily switch me to the Convert Point Tool, and then I just click directly on the anchor point. When I do, the direction handle on the right disappears, leaving only the one on the left:
Hold down "Alt" (Win) / "Option" (Mac) and click directly on the anchor point to remove the direction handle on the right, leaving only the one on the left.
Now, with the direction handle gone, if I click to add a new anchor point, I get a straight path segment between the two points :
With the direction handle on the right now gone, clicking to add a new anchor point adds a straight path segment between the two points.
I now have a curved path segment on the left and a straight one on the right! What if I wanted the exact opposite? Suppose I needed to start with a straight path segment and then follow it with a curve? To do that, first I'll start by clicking to add an initial anchor point. Then, since I want a straight path segment, all I need to do is click somewhere else to add a second anchor point, and I automatically get a straight path connecting the two points:
Click with the Pen Tool to add an initial anchor point, then click again somewhere else to add a second anchor point and create a straight path segment between them.
I'm going to keep my mouse button held down after clicking to add my second anchor point because I want my next path segment to be curved, and we know that in order to create a curve, we need a direction handle. To add a handle extending out from the right of my anchor point, I'm going to hold down Alt (Win) / Option (Mac), and with my mouse button still down, I'm simply going to to drag to the right of the anchor point. As I do, a direction handle will drag out along with it:
Hold down "Alt" (Win) / "Option" (Mac) and drag out a direction handle on the right of the anchor point.
Notice that the direction handle extended only from the right of the anchor point, not from both sides, leaving my straight path segment on the left in place. And now that I have my direction handle on the right, all I need to do to create my curve is click to add a third point:
Click to add a third anchor point, which creates a curved path segment between the previous anchor point and the new one.
And there we go! I now have a straight path segment on the left, followed by a curved segment on the right. Of course, most paths you draw are going to consist of more than just three anchor points. Let's say I wanted to continue this path, moving in the same general direction towards the right, and I want my next path segment to be curved as well. Just as I did a moment ago, I would leave my mouse button held down after clicking to add my third point. I would hold down Alt (Win) / Option (Mac) and I would drag out another direction handle. So far, we've only been dragging handles out towards the right, but what you really want to do is drag your handles out in the general direction you want the curve to follow. I want to create a curve that goes up and to the right, so I'm going to drag out a small handle in that same general direction:
Drag out your direction handles in the general direction of the curve.
Bacsis! A good practice to get into is to keep your direction handles small when first dragging them out, since you never really know how long or at what exact angle they need to be until the actual curve appears, and the curve doesn't appear until you've added both of its anchor points. Once you've added both points and the curve appears, you can easily go back and make any adjustments you need to the handles. You may even want to wait until you've drawn the entire path before worrying about adjusting the handles.
With my direction handle created, I'm going to click to add a fourth anchor point, and I'm going to drag out direction handles from it as well:
Adding a fourth anchor point along with direction handles extending from it.
I now have a third segment added to my path, this one being a curve. Notice that this curve actually has two direction handles controlling it, one extending from the right of my third anchor point and one extending from the left of my fourth point:

The third path segment now has two direction handles, one on either end, working together to control the curve.
The overall shape of this curve is now being controlled by the length and direction of both of these handles. Watch what happens to the curve when I move the handles. I'll drag the bottom handle down and to the right, and I'll drag the top handle up and to the left. I'll also drag both of these handles longer. The faint curve is the original for comparison:
Changing the direction and/or length of either handle changes the overall shape of the curve. After rotating and lengthening both handles, the curve now appears in an "S" shape.
The curve is now a bit "S" shaped, and that's because the bottom handle is controlling the angle and length of the curve as it flows out from the third anchor point, while the top handle is controlling the angle and length of the curve as it flows into the fourth point. Changing the length and/or direction of either handle will change the overall shape of the curve.
I'm going to press Ctrl+Alt+Z (Win) / Command+Option+Z (Mac) a couple of times to undo the changes I made, so the curve is once again in a simple arc shape as it was a moment ago, and I think I'll finish off this path with another straight segment, which means I'll need to remove that direction handle extending out from the right side of the fourth anchor point. We've already learned how to do that, by holding down Alt (Win) / Option (Mac) and clicking directly on the anchor point itself:
Hold down "Alt" (Win) / "Option" (Mac) and click directly on the anchor point to remove the direction handle on the right.
With the direction handle gone, all I need to do now to add a straight path segment is click to add another anchor point:
The direction handle on the right is now gone, so we can add a straight path segment simply by clicking to add another anchor point.
We could continue this path for as long as we wanted, adding more straight segments and curves, but I think we'll stop here because we've pretty much covered everything we need to know about drawing paths with the Pen Tool at this point. That was a lot of information to take in, especially if this is your first time learning about paths. As I mentioned at the beginning, you won't become a Pen Master simply by reading through this tutorial, just as you won't learn how to ride a bike, or drive a car, learn to swim, or play the piano simply by reading about it. But hopefully you have some sense at this point of how to draw paths with the Pen Tool, how to draw straight path segments, how to draw curves by dragging out direction handles, how to change the length and angle of the curve by rotating and resizing the handles, and how to combine straight and curved segments in a path.
To finish off our look at making selections with the Pen Tool, let's see a practical example of how to select an object with curves.
Here, we have a photo of a couple of dolphins leaping out of the water. Definitely a couple of very curvy creatures:

A photo of two dolphins jumping out of the water.
Let's say we want to select these dolphins so we can use them for a design or a collage, or whatever the case may be. If you were to try selecting them with the Lasso Tool, which is most likely what you would end up using if you didn't know how to use the Pen Tool, not only would you have a tough time, you'd have an even tougher time trying to convince yourself that you were happy with the results when you were done. The reason is because the Lasso Tool simply isn't capable of making curved selections very well. The biggest problem with it, besides being a pixel-based selection tool, is that it relies on you having a steady enough hand to move it smoothly around the curves. Even if you don't suffer from a caffeine addiction, you could drive yourself crazy trying to draw a perfectly smooth curve with your mouse, or even with a pen tablet, and when you've finally given up, you'll still be left with a selection full of rough, jagged edges that just scream "amateur!". No one likes to be called an amateur, especially when there's no need for it thanks to the Pen Tool!
Examine The Object First
Whenever you're about to select something with the Pen Tool, before you begin, take a moment to examine the object carefully to get a sense of where you're going to need to place your anchor points. Forget about all the details in the object and focus only on its shape. Where are the areas where the shape changes direction? Which parts of the shape are straight? Which parts are curved? If there's a curve, is it a smooth, continuous arc or does the angle change at a spot along the curve? Visualize in your mind where you're going to need to place your anchor points, because when you place one, you always want to be thinking about the next one and what the path segment between the two points needs to look like.
A Tool Of Elegance
One more thing to keep in mind is that the Pen Tool is meant to be a tool of elegance . It's not a nail gun or a staple gun. You don't want to just go clicking around your shape adding anchor points all "willy nilly" (that's a technical term). When using it to draw curves, you want those curves to be nice and smooth, otherwise we might as well just stick with the Lasso Tool. To keep the curves flowing smoothly, we need to limit the number of anchor points we use to create them. That's why you want to take a moment to examine the object first and visualize where the anchor points need to be. If you can outline a large section of the shape using only one curve with an anchor point on either end, that's what you want to do, because that's what's going to give you the kind of results you're looking for. The kind of results that scream "definitely not an amateur!".
Let's select these dolphins. I'm going to start my path in the middle of the photo, at the spot where the side of the dolphin on the left overlaps the rear flipper of the dolphin on the right. There's no right or wrong place to begin a path. This is just where I've decided to start. The first part of that rear flipper is straight, so since I don't need a direction handle to create a straight path segment, I'm simply going to click once with my Pen Tool to add my first anchor point, which will serve as the starting point for my path:
Adding the first anchor point.
As I mentioned earlier, you'll probably find it helpful to zoom in on your image as you're drawing your path. To scroll the image around on the screen as you're zoomed in, hold down the spacebar, which will switch you temporarily to the Hand Tool and allow you to move the image around on the screen by clicking and dragging it.
The top of that flipper actually has a slight curve to it as it approaches the dolphin's tail section, so for my second anchor point, I'm going to click at the point where the flipper and tail section meet, and I'm going to drag out short direction handles, dragging up and to the right in the direction that the tail section is moving. Notice that I've now created a slight curve along the flipper:
Adding the second anchor point and dragging out small direction handles to add a slight curve to the first path segment.
As I continue up along the tail, I can see that it stays straight for a short distance, followed by a curve to the right, so I'm going to click to add a third anchor point at the spot where the curve begins. This gives me a straight path segment between the previous point and the new one. I know there's a short direction handle extending out from the previous anchor point, which normally means that my new path segment will be a curve, not a straight section, but because the handle is so short and is also moving in the same direction as the path segment, there is no noticeable curve to it. Consider it a "mostly straight" path segment:
Clicking to add the third anchor point, creating a (mostly) straight path segment.
Continuing along, we come to the first real curve in our path. For this, I'm going to need to drag out a direction handle from the anchor point I just added, so I'm going to hold down Alt (Win) / Option (Mac), then drag out a handle in the general direction where I want the curve to flow as it starts. Notice how I'm only dragging out a handle from the one side of the anchor point, not both:
Hold "Alt" (Win) / "Option" (Mac) to drag out a direction handle from one side of an anchor point.
To add the curve, I'll click and drag at the spot where the curve ends, shaping the curve as I drag out the handles until it matches the curve of the dolphin's tail. If I needed to, I could also go back and change the length and direction of the handle at the start of the curve to fine-tune it, but in this case, I don't need to do that:
Adding an anchor point at the opposite end of the curve and dragging out direction handles from it, rotating and resizing them as needed until the curve matches the curve of the object.
The next area of the dolphin is pretty straight, right up until its back begins to merge with its dorsal fin, at which point there's another curve, so I'm going to click to add an anchor point just before the curve up the dorsal fin begins, which is going to give me another "mostly straight" path segment between the previous point and the new point. Then I'm going to once again hold down Alt (Win) / Option (Mac) and drag out a direction handle as I prepare for my next path segment which will be curved:
Click to add an anchor point, then hold down "Alt" (Win) / "Option" (Mac) and drag out a direction handle to prepare for the next path segment.
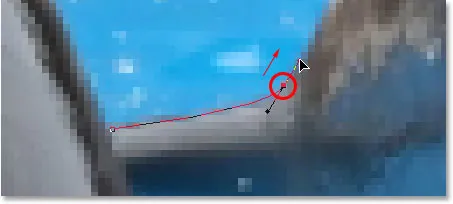
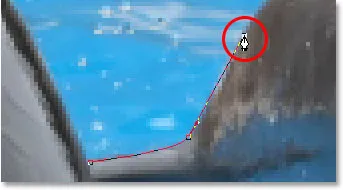
The left side of the dorsal fin consists mainly of one continuous curve upward until it gets near the very top, at which point the shape changes, so to create this curve, I'm going to click and drag at the point near the top where the curve will change direction. As we can see in the screenshot, this adds a curved path segment between the previous anchor point and the new one, but the curve is not yet following along the shape of the fin. It's going to need some fine-tuning:
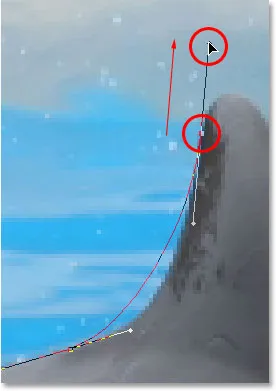
Adding a curve along the left side of the dorsal fin. The curve still needs some adjusting.
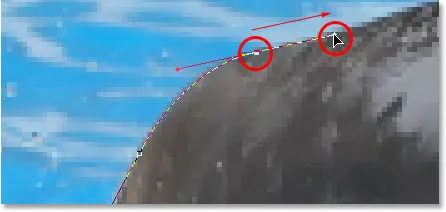
To adjust the curve, I'm simply going to hold down the Ctrl (Win) / Command (Mac) key, which gives me temporary access to the Direct Selection Tool, and I'm going to drag the handle extending out from the bottom anchor point towards the right to lengthen it, which is going to pull the angle of the curve in towards the right along with it, lining it up nicely with the curve of the fin. I've also rotated the top direction handles slightly in a clockwise direction just to be nit-picky, but the majority of the adjustment was done using the bottom direction handle:
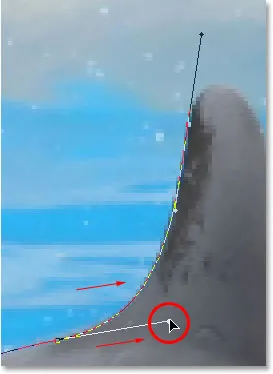
Adjust the curve by adjusting its direction handles.
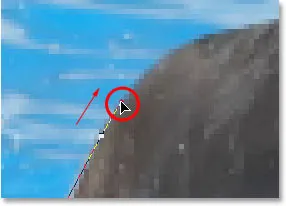
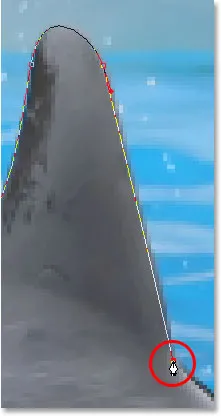
To add a curve around the top of the fin, I'll click and drag on the opposite side of it to add another anchor point with short direction handles. Notice though that we run into a bit of a problem. The direction handle on the left side of the curve is too long and it's pulling the curve away from the top of the fin:
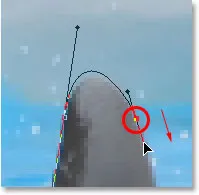
The direction handle on the left of the curve is too long, resulting in the curve not following the shape of the fin.
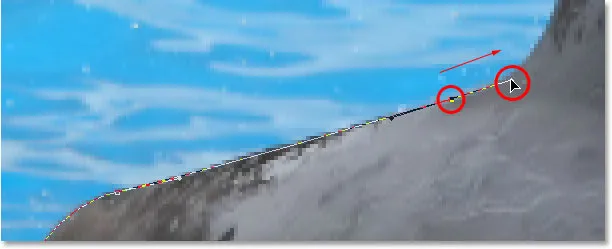
To fix that, all I need to do is once again hold down Ctrl (Win) / Command (Mac), then click on the end of the handle to select it and drag it shorter until the curve is the proper shape:
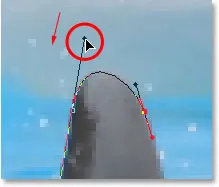
Shortening the length of the direction handle to adjust the shape of the curve.
Let's finish creating our path around the dorsal fin. The remainder of the fin is basically a straight line, so I'm going to click at the base of the fin to add another anchor point which adds the straight path segment, completing our path around the fin:
Adding an anchor point at the base of the fin to finish drawing the path around it.
Since you and I would both be here all day if I was to continue commenting on every anchor point, direction handle and path segment as we make our way slowly around the dolphins, and since we've covered everything we need to know at this point, I'm going to go ahead and draw the rest of the path, outlining both dolphins:
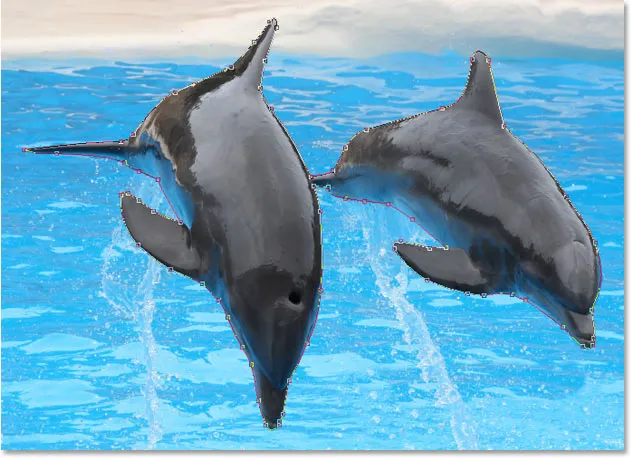
Both dolphins are now outlined by the path.
The dolphins have now been outlined with the path, and if we look at the Paths palette, we can see that sure enough, we have a path in the shape of the dolphins:
Photoshop's Paths palette showing the outline of the dolphins in the preview thumbnail.
As we've learned, Photoshop automatically names the path "Work Path", which means it's temporary and will be replaced if we start a new path. If you wanted to save it, you would need to double-click on the name "Work Path" and rename it to something else, like "Dolphins" in this case. I'm not going to worry about that, since I have no need to save it. All I want to do at this point is convert my path into a selection, and since I'm already in the Paths palette, I'll do that by clicking on the Load path as selection icon at the bottom of the palette:
Clicking the "Load path as selection" icon at the bottom of the Paths palette.
I could also have used the keyboard shortcut Ctrl+Enter (Win) / Command+Return (Mac) . Either way converts my path into a selection, and if I look at my photo, I can see that my path has indeed become a selection around the dolphins:

The path around the dolphins has now been converted into a selection.
Unde urmează …
Și acolo îl avem! The dolphins are now selected and ready for whatever plans we have for them. And with that, we wrap up our look at drawing paths and making selections with the Pen Tool in Photoshop! Pentru mai multe detalii despre instrumentele de selecție Photoshop, consultați secțiunea noastră Cum se fac selecții în seria Photoshop. Accesați secțiunea Noțiuni de bază pentru Photoshop pentru mai multe subiecte Photoshop!